LSM-Tree - LevelDb布隆过滤器 引言 布隆过滤器有点类似哈希表,但是比哈希表的效率要更高,因为使用了位来判断Key是否存在,布隆过滤器在完成高效搜索key是否存在的同时带来一定的副作用– 不保证Key一定存在 ,所以它只适用于允许一定容错率的系统。
一句话概括:Bloom Filter 是一个基于概率的数据结构 ,它只能告诉我们一个元素绝对不在集合内或可能 在集合内。
布隆过滤器比较悬浮的东西是它不保证元素百分百在一个集合内,所以适用于具备一定容错的业务,关于它的理论和实践很多内容都是参考或者直接摘自网上的资料加上自己的理解,如有错误欢迎指正。
理论 理论基础相关文章都大同小异,这里归纳自这一篇大神写的文章:Bloom Filter概念和原理_jiaomeng的博客-CSDN博客_bloomfilter ,简洁易懂,另外建议多参考原始论文,这里很多内容其实也是归纳自老外早已写出来的论文。
在这个网址中可以通过JS代码查看实际的运行效果:Bloom Filters by Example (llimllib.github.io)
注意在案例中使用了Fnv和 Murmur 这两个简单的哈希函数。
对于一个布隆过滤器,通常有如下定义:
n 个 key。
m bits 的空间 v,全部初始化为0。
Bloom Filter 理论建议使用k个相互独立的哈希函数(Hash Function),用于表示S={x1, x2,…,xn}的n个元素的集合,对任意一个元素x,第 i 个哈希函数映射的位置hi(x) 就会被置为1(1≤i≤k)。
如果有多个哈希函数位置都为1,那么只有 第一个哈希结果被使用 。比如下面的图中从左往右数第二个“1”所在的位置就是最终哈希函数选中位置。
为了判断当前的元素是否在集合当中,需要对于当前的元素y进行k次的哈希函数,如果所有的hi(y)次数是1(i <= i <= k中的次数都是1)就认为当前的元素y可能 在集合中,否则就绝对不存在。
以下面的内容y1因为存在hash为0的结果,所以认为不存在于集合,而y2所有的hash都落在1上,可以认为可能 存在集合。
布隆过滤器的理论内容相对简单,关键部分是哈希函数的选择和错误率的平衡。
错误率计算
首先布隆过滤器需要注意bit位长度,也就是数组长度。通常一个大的布隆过滤器会比小的布隆过滤器有更小的错误率。
误判率的计算公式为:(1-e^(-kn/m))^k。
推导过程如下,过程不是特别重要,了解最终公式即可:
n为key的个数,m为bits的位数(也就是数组大小)
根据这个公式可以发现,需要先确定可能插入的数据集的容量大小 n , 然后再调整 k 和 m 来为你的应用配置过滤器,m 越大,k 越大, n 越小,那么误判率越小。
考虑到 p 为设置为0的概率,因此可以认为 m 有一半设置为1,一半设置为0时,误判率最低,注意这句话在最后的推导部分会详细介绍。
多少个哈希函数?
根据错误率计算结论,这里又有一个问题,就是究竟应该选择多少个哈希函数,哈希函数的过多容易导致计算效率降低影响性能,太少又会让误判率升高。
高兴的是,这个公式也有人推导出来了:
hash 函数 k 的最优个数为 ln2 * (m/n) 。
可以通过以下的步骤来确定 Bloom filter 的大小:
确定 n 的变动范围
选定 m 的值
计算 k 的最优值
对于给定的n, m , k计算错误率。如果这个错误率不能接受,那么回到第二步,否则结束
Bloom filter 的时间复杂度和空间复杂度?
插入和测试操作的时间复杂度都是 O(k),这是因为如果想要插入或者查询一个元素,只需要对于元素进行k次数的函数运算。
空间复杂度就比较难以估算了,因为误差率的存在,大小是难以确定的,如果难以估算一个过滤器的大小,最好选择一个哈希表或者一个可拓展的 Bloom filter。
注意⚠️:LevelDB的过滤器大小是不能少于64位的bit数组。
m中多少位数为1合适
直接记住结论:可以认为 m 有一半设置为1,一半设置为0时,误判率最低 。
levelDB实现 LevelDB的布隆过滤器精髓在哈希函数上,它通过一个哈希达到多个哈希的性能,同时保证误判率在一定的限制。
具体的代码实现可以阅读bloom.cc :leveldb/bloom_test.cc at main · google/leveldb · GitHub
index.md介绍 这里先不深入源代码,先看看作者在index.md是如何解释的:leveldb/index.md at main · google/leveldb · GitHub
由于leveldb数据在磁盘上的组织方式,一个Get()的调用可能涉及到从磁盘上多次读取,所以可选的FilterPolicy机制可以被用来可以用来大大减少磁盘读取的次数,其实这里就是指的使用布隆过滤器提高过滤效率。
1
2
3
4
5
6
7
8
9
10
11
12
13
14
leveldb::Options options; options.filter_policy = NewBloomFilterPolicy(10 ); leveldb::DB* db; leveldb::DB::Open(options, "/tmp/testdb" , &db); ... use the database ... delete db;delete options.filter_policy;
前面的代码将基于布隆过滤器的过滤策略与数据库联系起来。
基于布隆过滤器的过滤依赖于在内存中为每个密钥保留一定数量的数据(本例中每个密钥为10bits,因为这是我们传递给NewBloomFilterPolicy的参数)。
这个过滤器将减少Get()调用所需的不必要的磁盘IO次数,提升效率大约是100倍 。增加每一个key的位数将导致更大的减少,但代价占用是更多的内存 。我们建议那些工作集不适合放在内存中的应用程序不适合在内存中使用,并且进行大量随机读取的应用程序设置一个过滤策略。
FilterPolicy 整个过滤器通过对外的接口FilterPolicy,目的是减少DB::Get()函数调用时间,通常内部默认使用布隆过滤器。
下面是接口定义的代码:
1
2
3
4
5
6
7
8
9
10
11
12
13
14
15
16
17
18
19
20
21
22
23
24
25
26
27
28
29
30
31
32
33
34
35
36
37
38
39
40
41
42
43
44
45
46
47
48
49
50
51
52
53
54
55
56
57
58
59
60
61
62
63
64
65
66
67
68
69
70
71
72
73
74
namespace leveldb {class Slice ;class LEVELDB_EXPORT FilterPolicy {public :virtual ~FilterPolicy();virtual const char * Name () const 0 ; virtual void CreateFilter (const Slice* keys, int n, std ::string * dst)const 0 ; virtual bool KeyMayMatch (const Slice& key, const Slice& filter) const 0 ;}; LEVELDB_EXPORT const FilterPolicy* NewBloomFilterPolicy (int bits_per_key) ; } #endif
bloom.cc 关于具体的代码解释放在了注释当中,比较值得关注的是创建过滤器的部分以及哈希函数的部分,这部分介绍的是过滤器本身的源代码,关键的哈希函数放到了下面的小节。
1 2 3 4 5 6 7 8 9 10 11 12 13 14 15 16 17 18 19 20 21 22 23 24 25 26 27 28 29 30 31 32 33 34 35 36 37 38 39 40 41 42 43 44 45 46 47 48 49 50 51 52 53 54 55 56 57 58 59 60 61 62 63 64 65 66 67 68 69 70 71 72 73 74 75 76 77 78 79 80 81 82 83 84 85 86 87 88 89 90 91 92 93 94 95 96 97 98 99 100 101 102 103 104 105 106 107 108 109 110 111 112 113 114 115 116 117 118 119 120 121 122 123 124 125 126 127 128 129 130 131 132 133 134 135 136 137 138 139 140 141 142 143 144 145 146 147 148 149 150 151 152 153 154 155 156 157 158 159 160 161 162 163 164 165 166 167 168 169 170 171 172 173 174 175 #include "leveldb/filter_policy.h" #include "leveldb/Slice.h" #include "util/hash.h" namespace leveldb { namespace {static uint32_t BloomHash (const Slice& key) return Hash(key.data(), key.size(), 0xbc9f1d34 ); } class BloomFilterPolicy :public FilterPolicy {public : explicit BloomFilterPolicy (int bits_per_key) : bits_per_key_ (bits_per_key) k_ = static_cast <size_t >(bits_per_key * 0.69 ); if (k_ < 1 ) k_ = 1 ; if (k_ > 30 ) k_ = 30 ; } const char * Name () const override return "leveldb.BuiltinBloomFilter2" ; } void CreateFilter (const Slice* keys, int n, std ::string * dst) const override size_t bits = n * bits_per_key_; if (bits < 64 ) bits = 64 ; size_t bytes = (bits + 7 ) / 8 ; bits = bytes * 8 ; const size_t init_size = dst->size(); dst->resize(init_size + bytes, 0 ); dst->push_back(static_cast <char >(k_)); char * array = &(*dst)[init_size]; for (int i = 0 ; i < n; i++) { uint32_t h = BloomHash(keys[i]); const uint32_t delta = (h >> 17 ) | (h << 15 ); for (size_t j = 0 ; j < k_; j++) { const uint32_t bitpos = h % bits; array [bitpos / 8 ] |= (1 << (bitpos % 8 )); h += delta; } } } bool KeyMayMatch (const Slice& key, const Slice& bloom_filter) const override const size_t len = bloom_filter.size(); if (len < 2 ) return false ; const char * array = bloom_filter.data(); const size_t bits = (len - 1 ) * 8 ; const size_t k = array [len - 1 ]; if (k > 30 ) { return true ; } uint32_t h = BloomHash(key); const uint32_t delta = (h >> 17 ) | (h << 15 ); for (size_t j = 0 ; j < k; j++) { const uint32_t bitpos = h % bits; if ((array [bitpos / 8 ] & (1 << (bitpos % 8 ))) == 0 ) return false ; h += delta; } return true ; } private : size_t bits_per_key_; size_t k_; }; } const FilterPolicy* NewBloomFilterPolicy (int bits_per_key) return new BloomFilterPolicy(bits_per_key); } }
NewBloomFilterPolicy 函数
为什么叫做新的布隆过滤器策略,可以看作者所给的注释:
返回一个新的过滤策略,该策略使用一个Bloom过滤器,每个密钥大约有指定的每个密钥的比特数。键的比特数是10。
注意使用之后必须要手动 释放掉相关对象内存:
调用者必须在使用该结果的任何数据库关闭后删除该结果 ,数据库被关闭后,调用者必须删除该结果。
如果使用的是自定义的比较器,它忽略了被比较的键的某些部分以及被比较的键的某些部分,这时候不允许使用NewBloomFilterPolicy(),而必须提供自定义的FilterPolicy实现,因为原始的过滤器它也忽略了键的相应部分。
例如,如果比较器忽略了尾部的空格 ,那么使用一个的FilterPolicy(比如NewBloomFilterPolicy),原始对FilterPolicy(如NewBloomFilterPolicy)行为就会出现失误,因为它不会忽略键的尾部空格 。
hash.cc 之前说过关键的代码其中之一是优质的哈希函数,下面是hash.cc的相关代码:
注意这里的哈希函数使用的伪随机数种子为0xbc9f1d34,对应的10进制为9134。
这里也可以看到LevelDB利用自己的优质哈希函数,使得一个函数取代N个函数的效果,这算是对理论的调整,内部也控制levelDB长度最少为64个bit位。
1 2 3 4 5 6 7 8 9 10 11 12 13 14 15 16 17 18 19 20 21 22 23 24 25 26 27 28 29 30 31 32 33 34 35 36 37 38 39 40 41 42 43 44 45 46 47 48 49 50 51 52 53 54 55 56 57 58 59 60 61 62 63 64 65 66 67 68 69 70 71 72 73 74 75 76 77 78 uint32_t Hash (const char * data, size_t n, uint32_t seed) const uint32_t m = 0xc6a4a793 ; const uint32_t r = 24 ; const char * limit = data + n; uint32_t h = seed ^ (n * m); while (data + 4 <= limit) { uint32_t w = DecodeFixed32(data); data += 4 ; h += w; h *= m; h ^= (h >> 16 ); } switch (limit - data) { case 3 : h += static_cast <uint8_t >(data[2 ]) << 16 ; FALLTHROUGH_INTENDED; case 2 : h += static_cast <uint8_t >(data[1 ]) << 8 ; FALLTHROUGH_INTENDED; case 1 : h += static_cast <uint8_t >(data[0 ]); h *= m; h ^= (h >> r); break ; } return h; }
Slice.h 可以看作类似Redis的简单字符串sds设计,只不过语言使用的是c++。
相关解释可以阅读文档:
leveldb/index.md at main · google/leveldb · GitHub
Slice 是一个简单的数据结构,包含一个进入一些外部存储的指针和size。 Slice的用户必须确保在相应的外部存储被取消分配后不使用该Slice(用完必须手动释放内存)。
多个线程可以在一个Slice上调用const方法 而不需要外部同步(线程安全对象),但如果任何一个线程可能会调用非const方法,所有访问同一Slice的线程都必须使用外部同步。
C++ 或者类C的 字符串可以简单的转化为Slice:
1
2
3
4
leveldb::Slice s1 = "hello" ; std ::string str ("world" ) leveldb::Slice s2 = str;
反过来也是一样的:
1
2
std ::string str = s1.ToString();assert(str == std ::string ("hello" ));
在使用Slice时要小心因为要由调用者来确保Slice所指向的外部字节数组在Slice使用时保持有效。例如,下面的例子是错误的:
下面的例子中Slice将可能指向一个外部的引用,同时不保证外部引用存在。
1
2
3
4
5
6
leveldb::Slice Slice; if (...) { std ::string str = ...; Slice = str; } Use(Slice);
当if语句超出范围时,str将被销毁,Slice的存储内容将消失。
其他内容 单元测试 作者编写的单元测试可以更为直观的看到具体效果,路径为:/leveldb-main/util/bloom_test.cc。
1 2 3 4 5 6 7 8 9 10 11 12 13 14 15 16 17 18 19 20 21 22 23 24 25 26 27 28 29 30 31 32 33 34 35 36 37 38 39 40 41 42 43 44 45 46 47 48 49 50 51 52 53 54 55 56 57 58 59 60 61 62 63 64 65 66 67 68 69 70 71 72 73 74 75 76 77 78 79 80 81 82 83 84 85 86 87 88 89 90 91 92 93 94 95 96 97 98 99 100 101 102 103 104 105 106 107 108 109 110 111 112 113 114 115 116 117 118 119 120 121 122 123 124 125 126 127 128 129 130 131 132 133 134 135 136 137 138 139 140 141 142 143 144 145 146 147 148 149 150 151 152 153 154 155 156 157 158 159 160 161 162 163 164 165 166 167 168 169 170 171 172 173 174 175 176 177 178 179 180 181 182 183 184 185 186 187 188 189 190 191 192 193 194 195 196 197 198 199 200 201 202 203 204 205 206 207 208 209 210 211 212 213 214 215 216 217 218 219 220 221 222 223 224 225 226 227 228 229 230 231 232 233 234 235 236 237 238 239 240 241 242 243 244 245 246 247 248 249 250 251 252 253 254 255 256 257 258 259 260 261 262 263 264 265 266 267 268 269 270 271 272 273 274 275 276 277 278 279 280 281 282 283 284 285 286 287 288 289 290 291 292 293 294 295 296 297 298 299 300 301 302 303 304 305 306 307 #include "gtest/gtest.h" #include "leveldb/filter_policy.h" #include "util/coding.h" #include "util/logging.h" #include "util/testutil.h" namespace leveldb { static const int kVerbose = 1 ; static Slice Key (int i, char * buffer) EncodeFixed32(buffer, i); return Slice(buffer, sizeof (uint32_t )); } class BloomTest :public testing::Test { public : BloomTest() : policy_(NewBloomFilterPolicy(10 )) {} ~BloomTest() { delete policy_; } void Reset () keys_.clear(); filter_.clear(); } void Add (const Slice& s) void Build () std ::vector <Slice> key_Slices; for (size_t i = 0 ; i < keys_.size(); i++) { key_Slices.push_back(Slice(keys_[i])); } filter_.clear(); policy_->CreateFilter(&key_Slices[0 ], static_cast <int >(key_Slices.size()), &filter_); keys_.clear(); if (kVerbose >= 2 ) DumpFilter(); } size_t FilterSize () const return filter_.size(); } void DumpFilter () std ::fprintf (stderr , "F(" ); for (size_t i = 0 ; i + 1 < filter_.size(); i++) { const unsigned int c = static_cast <unsigned int >(filter_[i]); for (int j = 0 ; j < 8 ; j++) { std ::fprintf (stderr , "%c" , (c & (1 << j)) ? '1' : '.' ); } } std ::fprintf (stderr , ")\n" ); } bool Matches (const Slice& s) if (!keys_.empty()) { Build(); } return policy_->KeyMayMatch(s, filter_); } double FalsePositiveRate () char buffer[sizeof (int )]; int result = 0 ; for (int i = 0 ; i < 10000 ; i++) { if (Matches(Key(i + 1000000000 , buffer))) { result++; } } return result / 10000.0 ; } private : const FilterPolicy* policy_; std ::string filter_; std ::vector <std ::string > keys_; }; TEST_F(BloomTest, EmptyFilter) { ASSERT_TRUE(!Matches("hello" )); ASSERT_TRUE(!Matches("world" )); } TEST_F(BloomTest, Small) { Add("hello" ); Add("world" ); ASSERT_TRUE(Matches("hello" )); ASSERT_TRUE(Matches("world" )); ASSERT_TRUE(!Matches("x" )); ASSERT_TRUE(!Matches("foo" )); } static int NextLength (int length) if (length < 10 ) { length += 1 ; } else if (length < 100 ) { length += 10 ; } else if (length < 1000 ) { length += 100 ; } else { length += 1000 ; } return length; } TEST_F(BloomTest, VaryingLengths) { char buffer[sizeof (int )]; int mediocre_filters = 0 ; int good_filters = 0 ; for (int length = 1 ; length <= 10000 ; length = NextLength(length)) { Reset(); for (int i = 0 ; i < length; i++) { Add(Key(i, buffer)); } Build(); ASSERT_LE(FilterSize(), static_cast <size_t >((length * 10 / 8 ) + 40 )) << length; for (int i = 0 ; i < length; i++) { ASSERT_TRUE(Matches(Key(i, buffer))) << "Length " << length << "; key " << i; } double rate = FalsePositiveRate(); if (kVerbose >= 1 ) { std ::fprintf (stderr , "False positives: %5.2f%% @ length = %6d ; bytes = %6d\n" , rate * 100.0 , length, static_cast <int >(FilterSize())); } ASSERT_LE(rate, 0.02 ); if (rate > 0.0125 ) mediocre_filters++; else good_filters++; } if (kVerbose >= 1 ) { std ::fprintf (stderr , "Filters: %d good, %d mediocre\n" , good_filters, mediocre_filters); } ASSERT_LE(mediocre_filters, good_filters / 5 ); } }
c++语法 补充:
explicit
C++ 参考手册 如下解释:
explicit修饰的构造函数不能被隐式调用。禁止类对象之间的隐式转换。
这篇文章我们关注的就是第一点:构造函数被explicit修饰后, 就不能再被隐式调用了 。
这里用了网上相关的案例:
1 2 3 4 5 6 7 8 9 10 11 12 13 14 15 16 17 18 19 20 21 22 23 24 25 26 27 28 29 30 31 32 33 34 35 36 37 38 39 40 41 #include <cstring> #include <string> #include <iostream> class Explicit { private : public : Explicit(int size ) { std ::cout << " the size is " << size << std ::endl ; } Explicit(const char * str) { std ::string _str = str; std ::cout << " the str is " << _str << std ::endl ; } Explicit(const Explicit& ins) { std ::cout << " The Explicit is ins" << std ::endl ; } Explicit(int a,int b) { std ::cout << " the a is " << a << " the b is " << b << std ::endl ; } }; int main () Explicit test0 (15 ) ; Explicit test1 = 10 ; Explicit test2 ("RIGHTRIGHT" ) ; Explicit test3 = "BUGBUGBUG" ; Explicit test4 (1 , 10 ) ; Explicit test5 = test1; }
虽然程序没有错误,但是把一个int类型或者const char*类型的变量赋值给Explicit类型的变量看起来总归不是很好,并且一旦使用出错很难排查,所以这时候构造函数被explicit修饰后, 就不能再被隐式调用了,添加关键字之后的效果不演示了,加上之后整个程序是无法通过编译的。
吐槽:很神经病的东西,在过去的版本中使用隐式调用提高编码效率,结果后面发现坑太大挖坑自己填。
resize函数
直接看下面的案例更容易理解:
myvector.resize(5);5 < 10 减小数组长度
myvector.resize(8,100);8 > 5 增大数组长度,指定填充元素
myvector.resize(12);12 > 8 增大数组长度,未指定填充元素
数学推导 推导部分给想要更加深入了解的人,可以直接记住上面的结论,看不懂也没关系。
下面的大部分内容来自论文根据 LNCS 4168 - Less Hashing, Same Performance: Building a Better Bloom Filter (harvard.edu) 翻译。
false position:误判率,也就是随着哈希和为1的bit位增加导致的误判率上升。
根据 bloom filter 的组成,对一个指定的 bit,其被设置为0、1的概率分别为:
1 2 P(1 ) = 1 /m P(0 ) = 1 - 1 /m
k 个 hash 函数,该 bit 设置为 0 的概率为:
1 P' (0 ) = P(0 ) ** k = (1 - 1 /m) ** k
再经过 n 个 key,该 bit 设置为 0 的概率为
1 P'' (0 ) = P' (0 ) ** n = (1 - 1 /m) ** kn
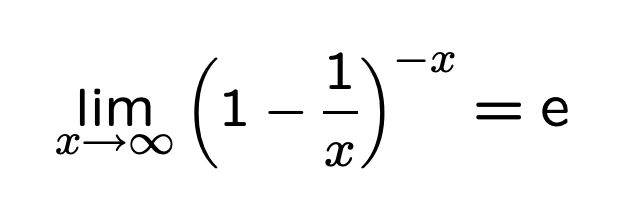
根据自然对数e的公式:
我们可以近似计算前面的P''(0)
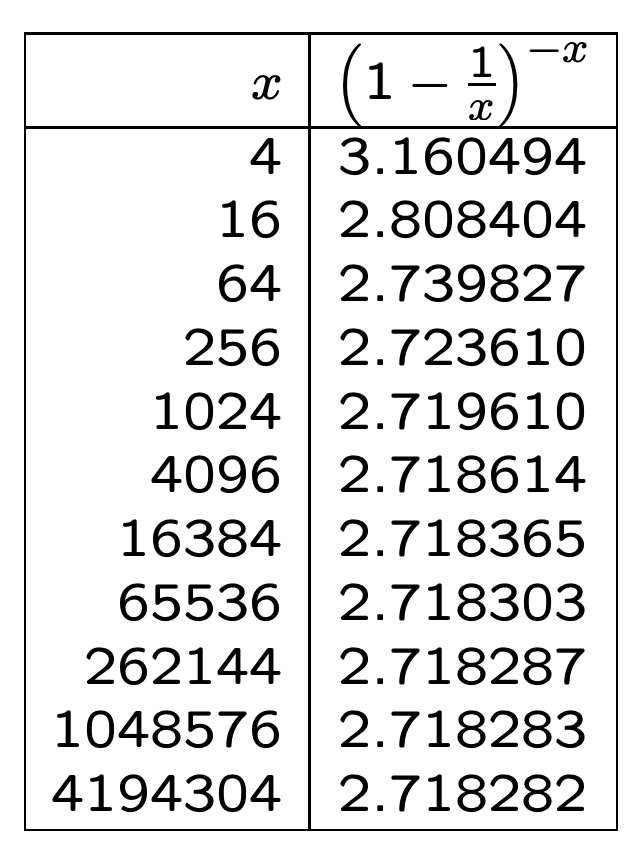
关于自然对数 e 的值,可以看下面的内容:
当检测某个实际不存在的 key 时,满足条件:
其对应的 k 个 bit 恰好都设置为了1,此时即 false positive 的场景。
概率为:
问题是,怎么最小化 false_positive 呢?
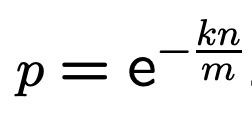
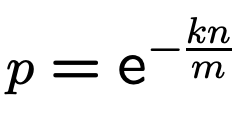
为了简化描述,先定义 p (即P''(0):某个 bit 设置为0的概率):
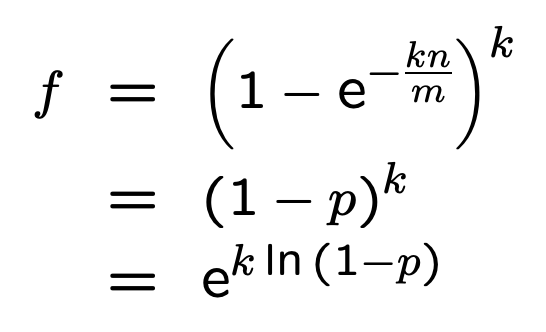
根据公式推导:
底数是 e,为固定值,那么最小化 false_positive_rate 即为最小化指数
根据之前的计算结果,我们可以做下面的变形:
最终得到结果 g:
根据对称性,当 p = 1/2 时,f 取得最小值。
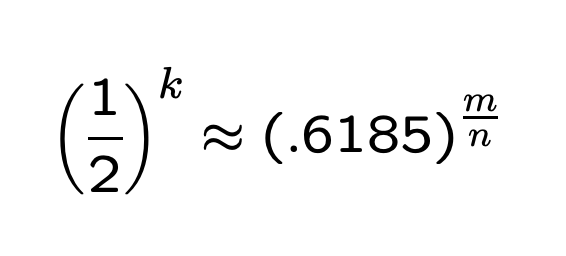
此时k、f最小值为:
最终的推导结果:
考虑到 p 为设置为0的概率,因此可以认为 m 有一半设置为1,一半设置为0时,误判率最低 。
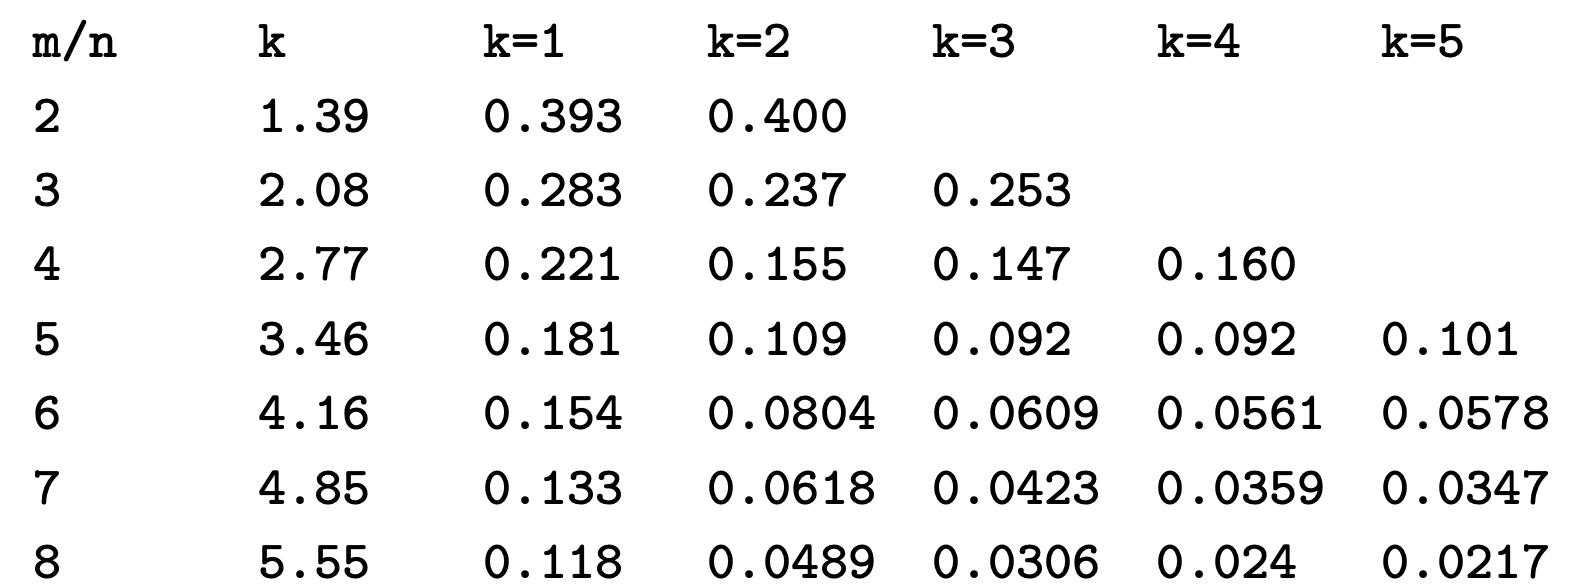
false position和m/n、k 的组合关系表例子可以下面的截图:
总结 Bloom Filter 通常用于快速判断某个元素是否在集合中。其本质上容忍一定的错误率来换取时空的高效性。
对于LevelDB的意义:在哈希表的基础上省下了冲突处理部分,LevelDB 在实现时使用了某种优化:利用一个哈希函数来达到近似 k 个哈希函数的效果 。这样做实现了高效的并发写入同时不会牺牲过多的性能。
LevelDB除开哈希函数和针对并发写入的优化部分之外,其他部分都非常贴合布隆过滤器的理论基础,也是优秀的学习案例,作为C++版本的过滤器生产案例应用也是一个不错的参考范本。
最后,有问题找布隆准没错。
参考资料 下面的资料绝对能让你吃透布隆过滤器。
公众号请“阅读原文”获取访问链接。
Bloom Filter概念和原理_jiaomeng的博客-CSDN博客_bloomfilter Bloom Filters by Example (llimllib.github.io) C++四种类型转换运算符:static_cast、dynamic_cast、const_cast和reinterpret_cast_C语言中文网 (biancheng.net) LNCS 4168 - Less Hashing, Same Performance: Building a Better Bloom Filter (harvard.edu) leveldb/index.md at main · google/leveldb · GitHub im2005b.pdf (harvard.edu) Compressed bloom filters - Networking, IEEE/ACM Transactions on (harvard.edu) leveldb笔记之9:bloom filter - Ying’s Blog (izualzhy.cn)


