引言 在阿里云的官方网站提供了RocketMq的商用版本,但是个人在项目应用上发现和SpirngBoot以及Spring Cloud(Alibaba)等开源的RocketMQ依赖虽然可以正常兼容,但是依然出现了注解失效、启动报错,商用和开源版本的不兼容导致部分代码要重复编写的蛋疼问题。
这样的兼容问题不是简单加个SDK依赖,切换到商用配置就可以直接使用的(因为个人起初真就是这么想),为了避免后面再遇到这种奇葩 的开发测试用开源RocketMq,生产环境需要使用商用集群的RocketMq的混合配置的业务场景,个人花了小半天时间熟读阿里云的接入文档,加上各种尝试和测试,总结出一套可以快速使用的兼容模板方案。
如果不了解阿里云商用RocketMq,可以看最后一个大节的【阿里云商用RocketMq介绍】介绍。个人的兼容方案灵感来自于官方提供的这个DEMO项目:springboot/java-springboot-demo 。
注意本方案是基于SpringBoot2.X 和 Spring cloud Alibaba 的两个项目环境构建项目基础,在SpringBoot上只做了生产者的配置,而在Spring Cloud Alibaba的Nacos上进行了生产者和消费者的完整兼容方案。
最后注意兼容集成的版本为商用RocketMq使用4.x 版本,最近新出的5.X 的版本并未进行测试 ,不保证正常使用。
兼容关键点
在沿用SpringBoot的YML基础配置基础上实现商用和开源模式的兼容。
商用RocketMq需要使用官方提供的依赖包,依赖包可以正常兼容SpringBoot等依赖。
集成之后便于开发和扩展,并且易于其他开发人员理解。
两种模式之间互相不会产生干扰。
SpringBoot2.X 兼容 下面先介绍SpringBoot项目 的兼容。
SpringBoot项目兼容 开源版本 首先我们观察YAML文件,对于开源版本的RocketMq 设置,单机版本可以直接配置一个ip和端口即可,如果是集群则用分号隔开多个NameServer的连接IP地址(NameServ独立部署,内部进行自动同步 )。
1 2 3 4 5 6 7 8 9 10 11 12 13 rocketmq: use-aliyun-rocketSever: false name-server: 192.168 .58 .128 :9876 producer: group: testGroup secret-key: NONE access-key: NONE timeoutMillis: NONE
SpringBoot中集成开源的RocketMq非常简单,只需要一个依赖就可以自动完成相关准备:
1 2 3 4 5 <dependency > <groupId > org.apache.rocketmq</groupId > <artifactId > rocketmq-spring-boot</artifactId > <version > 2.2.2</version > </dependency >
具体的使用通常为封装或者直接使用RocketMqTemplate:
1
2
3
4
5
6
7
8
9
10
11
12
13
14
15
16
17
18
19
20
21
22
23
24
25
@Autowired private RocketMQTemplate mqTemplate;public void sendRocketMqUniqueTextMessage (String topic, String tag, String queueMsg) if (StringUtils.isNotEmpty(topic) && StringUtils.isNotEmpty(tag) && StringUtils.isNotEmpty(queueMsg)) { String queueName = topic + ":" + tag; MessageData messageData = new MessageData(); messageData.setMsgId(IdUtil.randomUUID()); messageData.setMsgContent(queueMsg); queueMsg = JSON.toJSONString(messageData); log.info("线程:{},向队列:{},发送消息:{}" , Thread.currentThread() .getName(), queueName, queueMsg); try { mqTemplate.syncSend(queueName, queueMsg); } catch (Exception e) { log.info("向队列:{},发送消息出现异常:{}" , queueName, queueMsg); SaMqMessageFail saMqMessageFail = new SaMqMessageFail(); saMqMessageFailService.insert(saMqMessageFail); } } }
开源版本的SpringBoot集成RocketMq就是如此简单。
商用版本 商用版本RocketMq我们使用商业版TCP协议SDK(推荐) ,注意这里用的是4.X版本 。商用版本的YAML配置和开源版本显式配置 是一样的,但是需要注意参数use-aliyun-rocketSever=true,并且secretKey和accessKey以及name-server都需要配置为阿里云提供的配置,最后设置消息发送超时时间timeoutMillis设置合理时间(单位为毫秒),便于排查问题和防止线程长期占用:
1 2 3 4 5 6 7 8 9 10 11 12 13 14 15 16 17 18 rocketmq: use-aliyun-rocketSever: true name-server: http://xxxxx.aliyuncs.com:8080 producer: group: testGroup secret-key: xxx access-key: xxxx timeoutMillis: 15000 consumer: group: testGroup secret-key: xxx access-key: xxxx timeoutMillis: 15000
注意这里仅仅配置了生产者,读者可以按需设置为消费者,设置方式和生产者同理。
设置YAML之后,我们需要在Maven中引入下面的配置:
1 2 3 4 5 6 <dependency > <groupId > com.aliyun.openservices</groupId > <artifactId > ons-client</artifactId > <version > 1.8.8.1.Final</version > </dependency >
最后应该如何使用呢?这里就是商用RocketMq比较蛋疼的点了,使用RocketMQTemplate是这种情况下是无法使用商用RocketMq的,我们需要 手动注入商用的SDK依赖ProducerBean ,具体的操作如下:
构建配置类 ,这里仿照了官方提供的demo增减配置:
1 2 3 4 5 6 7 8 9 10 11 12 13 14 15 16 17 18 19 20 21 22 23 24 25 26 27 28 29 30 31 32 33 34 35 36 37 38 39 40 41 42 43 44 45 46 47 48 49 50 51 52 53 54 55 56 @Data @Configuration @ConfigurationProperties (prefix = "rocketmq" )public class AliyunRocketMqConfig @Value ("${rocketmq.use-aliyun-rocketSever:null}" ) private String useAliyunRocketMqServerEnable; @Value ("${rocketmq.producer.access-key:null}" ) private String accessKey; @Value ("${rocketmq.producer.secret-key:null}" ) private String secretKey; @Value ("${rocketmq.name-server:null}" ) private String nameSrvAddr; @Value ("${rocketmq.producer.group:null}" ) private String groupId; @Value ("${rocketmq.producer.timeoutMillis:null}" ) private String timeoutMillis; public Properties getRocketMqProperty () Properties properties = new Properties(); properties.setProperty(PropertyKeyConst.GROUP_ID,this .getGroupId()); properties.setProperty(PropertyKeyConst.AccessKey, this .accessKey); properties.setProperty(PropertyKeyConst.SecretKey, this .secretKey); properties.setProperty(PropertyKeyConst.NAMESRV_ADDR, this .nameSrvAddr); properties.setProperty(PropertyKeyConst.SendMsgTimeoutMillis, this .timeoutMillis); return properties; } }
构建商用RocketMq初始化类。这里会遇到比较蛋疼的事情 ,因为我们的依赖是商用RocketMq与开源的SpringBoot依赖共存的,虽然我们可以商用的RocketMq,但是启动的时候会执行到此类进行初始化,返回NULL会导致SpringBoot项目无法正常启动 ,这里无奈只能使用一个warn日志进行提示开源版本有可能出现Bean被覆盖问题,实际上使用下来没有特别大的影响。
写的比较丑陋,读者有更优雅的处理方式欢迎指导。笔者目前只想到了使用这种“不管”的方式保证项目不改任何代码的情况正常运行。
1 2 3 4 5 6 7 8 9 10 11 12 13 14 15 16 17 18 19 20 21 @Configuration @Slf 4jpublic class AliyunProducerInit @Autowired private AliyunRocketMqConfig aliyunRocketMqConfig; @Bean (initMethod = "start" , destroyMethod = "shutdown" ) public ProducerBean buildProducer () if (!Boolean.valueOf(aliyunRocketMqConfig.getUseAliyunRocketMqServerEnable())){ log.warn("非商用版本为了兼容依然需要注入此Bean,但是只读取有关nameServ和group信息" ); } ProducerBean producer = new ProducerBean(); producer.setProperties(aliyunRocketMqConfig.getRocketMqProperty()); return producer; } }
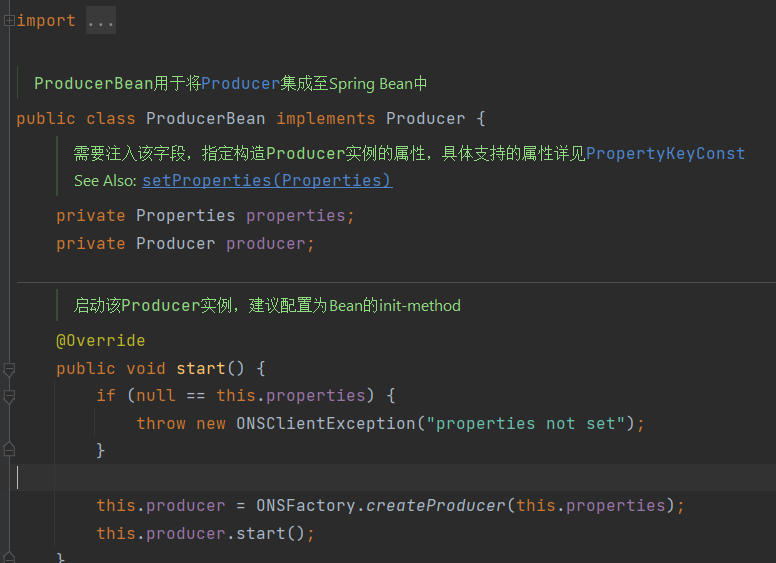
此外这里必须要吐槽一下商用RocketMq的注释居然是全中文 的!比如com.aliyun.openservices.ons.api.bean.ProducerBean的注释:
这样是好事还是坏事,大家自行体会。。。。。个人第一次看到的时候着实被震惊了。
做完上面两步之后,我们就可以实现RocketMqTemplate调用请求,至此完成兼容。
SpringBoot项目兼容小结 这里简单小结一下SpringBoot的兼容过程,可以看到整个步骤仅仅是 在商用RocketMq多做了一步bean注入的操作而已,整体使用上十分简单。但是这里只介绍了生产者的集成,那么消费者如何兼容?稍安勿躁,我们接着看Spring Cloud版本的集成案例。
Spring Cloud Alibaba项目兼容 目前国内使用的比较多的是Spring Cloud Alibaba ,注意这些配置都写入到Nacos当中。
开源版本 开源版本的接入方式和SpringBoot是一样的,这里简单回顾:
开源版本需要设置参数,这里设置了生产者和消费者:
1 2 3 4 5 6 7 8 9 10 11 12 13 14 15 16 rocketmq: use-aliyun-rocketSever: false name-server: 192.168 .0 .92 :9876 producer: group: testGroup secret-key: NONE access-key: NONE timeoutMillis: 15000 consumeThreadNums: 20 consumer: group: testGroup secret-key: NONE access-key: NONE timeoutMillis: 15000 consumeThreadNums: 20
添加依赖:
1 2 3 4 5 <dependency > <groupId > org.apache.rocketmq</groupId > <artifactId > rocketmq-spring-boot</artifactId > <version > 2.2.2</version > </dependency >
使用RocketMqTemplate可以进行消息发送,而消费者则需要使用监听器+注解的方式,快速注入一个消费者。大体模板如下:
1
2
3
4
5
6
7
8
9
10
11
@Slf 4j@Component @RocketMQMessageListener (topic = "test_topic" , consumerGroup = "testGroup" , selectorExpression = "test_tag" )public class QueueRemoteRecoListener implements RocketMQListener <MessageExt > @Override public void onMessage (MessageExt message) } }
商用版本 这节是本文稍微复杂一点的部分,我们按照步骤介绍接入过程:
在Nacos的配置中加入RocketMq商用所需的配置内容,和开源版本的设置类似:
1 2 3 4 5 6 7 8 9 10 11 12 13 14 15 16 17 18 rocketmq: use-aliyun-rocketSever: true name-server: http://xxxx.mq.aliyuncs.com:80 producer: group: testGroup secret-key: xxx access-key: xxx timeoutMillis: 15000 consumeThreadNums: 20 consumer: group: testGroup secret-key: xxx access-key: xxx timeoutMillis: 15000 consumeThreadNums: 20
添加商用RocketMq的TCP接入方式需要的依赖包。
1 2 3 4 5 6 <dependency > <groupId > com.aliyun.openservices</groupId > <artifactId > ons-client</artifactId > <version > 1.8.8.1.Final</version > </dependency >
新增配置类 ,和SpringBoot的商用版本方式也是类似的:
1 2 3 4 5 6 7 8 9 10 11 12 13 14 15 16 17 18 19 20 21 22 23 24 25 26 27 28 29 30 31 32 33 34 35 36 37 38 39 40 41 42 43 44 45 46 47 48 49 50 51 52 53 54 55 56 57 58 59 60 61 62 63 64 65 66 67 68 69 @Data @Configuration @ConfigurationProperties (prefix = "rocketmq" )public class AliyunCommercialRocketMqConfig @Value ("${rocketmq.use-aliyun-rocketSever:null}" ) private String useAliyunRocketMqServerEnable; @Value ("${rocketmq.consumer.access-key:null}" ) private String accessKey; @Value ("${rocketmq.use-aliyun-rocketsever:null}" ) private String useAliyunRocketServer; @Value ("${rocketmq.consumer.secret-key:null}" ) private String secretKey; @Value ("${rocketmq.name-server:null}" ) private String nameSrvAddr; @Value ("${rocketmq.consumer.group:null}" ) private String groupId; @Value ("${rocketmq.consumer.timeoutMillis:null}" ) private String timeoutMillis; @Value ("${rocketmq.consumer.consumeThreadNums:null}" ) private String consumeThreadNums; public Properties getRocketMqProperty () Properties properties = new Properties(); properties.setProperty(PropertyKeyConst.GROUP_ID,this .getGroupId()); properties.setProperty(PropertyKeyConst.AccessKey, this .accessKey); properties.setProperty(PropertyKeyConst.SecretKey, this .secretKey); properties.setProperty(PropertyKeyConst.NAMESRV_ADDR, this .nameSrvAddr); properties.setProperty(PropertyKeyConst.SendMsgTimeoutMillis, this .timeoutMillis); return properties; } }
下一步是扩展官方消息订阅类 ,为啥要这样做?主要是接入实验中发现官方的消息订阅类没有 全量参数 的构造器,难以对于消息订阅类静态参数化 常量,构造一个订阅消息使用默认方式还需要static代码块设置。所以这里对于官方的消息订阅类进行扩展,子类代码是对于父类拷贝了一遍,没有做其他改动:
1 2 3 4 5 6 7 8 9 10 11 12 13 14 15 16 17 18 19 20 21 22 23 24 25 26 27 28 29 30 31 32 33 34 35 36 37 38 39 40 41 42 43 44 45 46 47 48 49 50 51 52 53 54 55 56 57 58 59 @Data @ToString @AllArgsConstructor @NoArgsConstructor public class AliyunCommercialRocketMqSubscriptionExt extends Subscription private String topic; private String expression; private String type; @Override public int hashCode () final int prime = 31 ; int result = 1 ; result = prime * result + ((topic == null ) ? 0 : topic.hashCode()); return result; } @Override public boolean equals (Object obj) if (this == obj) { return true ; } if (obj == null ) { return false ; } if (getClass() != obj.getClass()) { return false ; } AliyunCommercialRocketMqSubscriptionExt other = (AliyunCommercialRocketMqSubscriptionExt) obj; if (topic == null ) { if (other.topic != null ) { return false ; } } else if (!topic.equals(other.topic)) { return false ; } return true ; } }
接着我们构建静态化的消息订阅类,这个常量类会封装系统需要使用到的消息订阅对象,在后续注册监听器需要使用,这里先提前定义。
1 2 3 4 5 6 7 8 9 10 11 12 13 14 public final class AliyunCommercialRocketMqConstants public static final String TEST_TOPIC = "test_topic" ; public static final String TEST_TAG = "test_tag" ; public static final AliyunCommercialRocketMqSubscriptionExt QUEUE_TEST = new AliyunCommercialRocketMqSubscriptionExt(RocketMqKey.TEST_TOPIC, RocketMqKey.TEST_TAG, null ); }
为了方便管理,我们可以把这些关键Key在单独放到一个类:
1
2
3
4
5
6
7
8
9
10
11
12
13
14
15
public class RocketMqKey public static final String TEST_TOPIC = "test_topic" ; public static final String TEST_TAG = "test_tag" ; } public final class AliyunCommercialRocketMqConstants public static final AliyunCommercialRocketMqSubscriptionExt QUEUE_TEST = new AliyunCommercialRocketMqSubscriptionExt(RocketMqKey.TEST_TOPIC, RocketMqKey.TEST_TAG, null ); }
做好一系列准备之后,我们开始商用版本生产者兼容 ,商用版本的发送者可以像是下面这样封装官方提供的demo,也可以使用注入ProducerBean 的方式集成:
1 2 3 4 5 6 7 8 9 10 11 12 13 14 15 16 17 18 19 20 21 22 23 24 25 26 27 28 29 30 31 32 33 34 35 36 37 38 39 40 41 42 43 44 45 46 47 48 49 50 51 52 53 54 55 56 57 58 59 60 61 62 63 64 65 66 67 68 69 70 71 72 73 74 75 76 77 78 79 80 81 82 83 84 85 86 87 88 89 90 91 92 93 94 95 96 97 98 99 100 101 102 103 104 105 106 107 108 109 110 111 112 113 114 115 116 117 118 119 120 121 122 123 124 125 126 127 128 129 130 131 132 133 134 135 136 137 138 139 140 141 142 143 144 145 146 147 148 149 150 151 152 153 154 155 156 157 158 159 160 161 162 163 164 165 166 167 168 169 170 171 172 173 174 175 176 177 178 179 @Component @Slf 4jpublic class AliyunCommercialRocketMqSendUtils private static final long KEEP_ALIVE_TIME = 60L ; private final ThreadPoolExecutor THREAD_POOL_EXECUTOR = new ThreadPoolExecutor(0 , Integer.MAX_VALUE, KEEP_ALIVE_TIME, TimeUnit.SECONDS, new SynchronousQueue<>()); @Autowired private Producer producer; @Autowired private SaMqMessageFailService saMqMessageFailService; @Autowired private AliyunRocketMqConfig aliyunRocketMqConfig; public void singleAsyncSend (String topic, String tag, String msgBody, SendCallback sendCallback) singleAsyncSend(topic, tag, msgBody, null , sendCallback); } public void singleAsyncSend (String topic, String tag, String msgBody, String key, SendCallback sendCallback) if (Boolean.FALSE.equals(Boolean.valueOf(aliyunRocketMqConfig.getUseAliyunRocketMqServerEnable()))){ throw new UnsupportedOperationException("请设置 UseAliyunRocketServer=true 切换到商用rocketMq模式" ); } if (StringUtils.isAnyBlank(topic, tag, msgBody)) { throw new IllegalArgumentException("topic, tag and msgBody must be not blank" ); } producer.setCallbackExecutor(THREAD_POOL_EXECUTOR); Message msg = new Message( topic, tag, msgBody.getBytes()); if (CharSequenceUtil.isNotBlank(key)) { msg.setKey(key); } try { producer.sendAsync(msg, sendCallback); } catch (ONSClientException exception) { log.error("【RocketMq-Commercial】发送失败,消息存储到失败记录表,发送 topic => {}, 发送 tag => {}, msgBody => {}, key => {}(如果设置key,可以使用key查找消息),商用版需要在RocketMq云服务重试,失败原因为: {}" , topic, tag, msgBody, key, exception.getMessage()); buildMqErrorInfoAndInsertDb(msgBody, exception); } } public void singleSyncSend (String topic, String tag, String msgBody) singleSyncSend(topic, tag, msgBody, null ); } public void singleSyncSend (String topic, String tag, String msgBody, String key) if (!Boolean.valueOf(aliyunRocketMqConfig.getUseAliyunRocketMqServerEnable())){ throw new UnsupportedOperationException("请设置 UseAliyunRocketServer=true 切换到商用rocketMq模式" ); } if (StringUtils.isAnyBlank(topic, tag, msgBody)) { throw new IllegalArgumentException("topic, tag and msgBody must be not blank" ); } Message msg = new Message( topic, tag, msgBody.getBytes()); if (CharSequenceUtil.isNotBlank(key)) { msg.setKey(key); } try { SendResult sendResult = producer.send(msg); log.info("【RocketMq-Commercial】推送成功,singleSyncSend => {}" , JSON.toJSONString(sendResult)); } catch (ONSClientException e) { log.error("【RocketMq-Commercial】发送失败,消息存储到失败记录表,发送 topic => {}, 发送 tag => {}, msgBody => {}, key => {}(如果设置key,可以使用key查找消息),商用版需要在RocketMq云服务重试,失败原因为: {}" , topic, tag, msgBody, key, e.getMessage()); buildMqErrorInfoAndInsertDb(msgBody, e); } } private void buildMqErrorInfoAndInsertDb (String msgBody, ONSClientException e) SaMqMessageFail saMqMessageFail = new SaMqMessageFail(); saMqMessageFail.setMqId(IdUtil.randomUUID()); saMqMessageFail.setQueueName("RocketMq-Commercial" ); saMqMessageFail.setQueueMessage(msgBody); saMqMessageFail.setStatus(2 ); saMqMessageFail.setProcCount(1 ); saMqMessageFail.setFailReason(e.toString()); saMqMessageFail.setCreateDate(new Date()); saMqMessageFailService.insert(saMqMessageFail); } }
注入ProductBean的方式可以从上面提到的SpringBoot集成方式处理。
现在我们解决之前遗留的问题,如果是消费者,应该如何更优雅的接收消息?首先我们需要明白,商用RocketMq注入是需要依靠手动构建监听器 ,但是我们上面提到SpringBoot提供了注解+ @Component的方式实现队列监听的消费者。此外为了避免和开源版本冲突,我们使用之前参数配置自定义的开关,在遇到开源版本的时候我们返回null (这里返回null Spring会扫描获取SpringBoot的RocketMq依赖,不会出现报错和无法启动的问题,和前面的情况略有不同)防止自动注入商用RocketMq的监听器。
下面是商用版本注入ConsumerBean的代码,订阅商用RocketMq的消费监听器:
1 2 3 4 5 6 7 8 9 10 11 12 13 14 15 16 17 18 19 20 21 22 23 24 25 26 27 28 29 30 31 32 33 34 35 36 37 38 39 40 41 @Component @Slf 4jpublic class AliyunCommercialRocketMqQueueConsumer @Autowired private AliyunCommercialRocketMqConfig aliyunCommercialRocketMqConfig; @Autowired private AliyunCommerciaRocketMqTestListener aliyunCommerciaRocketMqTestListener; @Bean (initMethod = "start" , destroyMethod = "shutdown" ) public ConsumerBean buildConsumer () if (!Boolean.valueOf(aliyunCommercialRocketMqConfig.getUseAliyunRocketServer())){ log.warn("非商用版本不注入商用版本监听器" ); return null ; } ConsumerBean consumerBean = new ConsumerBean(); Properties properties = aliyunCommercialRocketMqConfig.getRocketMqProperty(); properties.setProperty(PropertyKeyConst.GROUP_ID, aliyunCommercialRocketMqConfig.getGroupId()); properties.setProperty(PropertyKeyConst.ConsumeThreadNums, aliyunCommercialRocketMqConfig.getConsumeThreadNums()); consumerBean.setProperties(properties); Map<Subscription, MessageListener> subscriptionTable = new HashMap<>(2 ); subscriptionTable.put(AliyunCommercialRocketMqConstants.QUEUE_TEST, aliyunCommerciaRocketMqTestListener); consumerBean.setSubscriptionTable(subscriptionTable); return consumerBean; } }
AliyunCommerciaRocketMqTestListener 自定义监听器为了兼容商用和开源版本做了下面的改变,为了方便理解这里加入了相关注解:
1 2 3 4 5 6 7 8 9 10 11 12 13 14 15 16 17 18 19 20 21 22 23 24 25 26 27 28 29 30 31 32 33 34 35 36 37 38 39 40 41 @Slf 4j@Component @RocketMQMessageListener (topic = RocketMqKey.TEST_TOPIC, consumerGroup = RocketMqKey.TEST_GROUP, selectorExpression = RocketMqKey.TEST_TAG)public class QueueRemoteReconListener implements RocketMQListener <MessageExt >, MessageListener @Override public void onMessage (MessageExt message) } @Override public Action consume (Message message, ConsumeContext context) } }
以上就是消费者的兼容处理,既可以满足开源版本的注解开发要求,也可以不膨胀类的情况下沿用扩展。
Spring Cloud Alibaba项目兼容小结 从个人的角度来看,在生产者的兼容上比较容易实现,按照官方的demo构建带商用RocketMq的ProducerBean即可,而消费者的集成则要复杂一些,这里为了考虑不重复的设置或者写重复代码,把关键的配置静态化,同时为了官方写的粗糙的消息订阅类做了继承覆盖的操作兼容。此外为了防止开源版本的消费者Bean被商用的监听器覆盖导致失效,使用了简单的开关来进行Bean的注入控制,写的比较粗糙,读者有更好的写法欢迎讨论。
总体来看来说商用版本的RocketMq集成起来略微麻烦,但是还是可以接受。此外也可以看到SDK的兼容性实际上是比较简陋的,很多地方的很像但是又完全是自己重新设计的,感觉就是一个新的团队给老团队做出来的东西做兼容的感觉,不过不就是桥接嘛,我也会,所以最后个人对付消费者兼容就用来多接口实现的兼容写法了。
最终的集成效果是开源版本关闭注入bean的开关,配置为了照顾Properties对于不需要的配置进行占位处理,而商用版本则打开开关,通过自定义注入监听器的方式顶替掉SpringBoot的依赖。
最后的效果是只需要修改RocketMq的配置,启动之后自动连接到相关的RocketMq。
开源版本:
1 2 3 4 5 6 7 8 9 10 11 12 13 14 15 16 rocketmq: use-aliyun-rocketSever: false name-server: 192.168 .0 .92 :9876 producer: group: testGroup secret-key: NONE access-key: NONE timeoutMillis: 15000 consumeThreadNums: 20 consumer: group: testGroup secret-key: NONE access-key: NONE timeoutMillis: 15000 consumeThreadNums: 20
商用版本
1 2 3 4 5 6 7 8 9 10 11 12 13 14 15 16 17 18 rocketmq: use-aliyun-rocketSever: true name-server: http://xxxx.mq.aliyuncs.com:80 producer: group: testGroup secret-key: xxx access-key: xxx timeoutMillis: 15000 consumeThreadNums: 20 consumer: group: testGroup secret-key: xxx access-key: xxx timeoutMillis: 15000 consumeThreadNums: 20
阿里云商用RocketMq简单介绍(4.X版本) 官方介绍:https://help.aliyun.com/product/29530.html
有关RocketMq本身的介绍部分可以阅读:[[【RocketMq】RocketMq 扫盲]],这里挑了商用版本个人认为需要关注的几个点进行介绍。注意这里使用的商用RocketMq版本为4.X的版本。
计费模式 商用RocketMq主要分为下面几个部分:
主系列:标准版、专业版、铂金版
子系列:单节点版、集群版
个人最后是白嫖了公司的商用集群版RocketMq进行实验,计费的方式分为包年包月 和按量付费 ,前者适用于流量比较大并且固定的情况,使用套餐比较划算,而后者按需付费则适用于RocketMq使用较少(或者不稳定)或者调用量较少的情况,个人学习也比较推荐按量付费模式,比包年包月划算很多。
如果出现欠费,在实例停服7天后两种付费模式均会清除所有的RocketMq数据,而日常欠费则会被自动停用,嘛,和电话卡欠费差不多的道理,这里就不过多拓展了。如果要退订商用RocketMq的服务。按量付费可以随时退订,包年包月也会根据天数进行退订。
PS:看完这一整套计费模式下来,发现还是挺良心的。让我没想到的是包年包月居然可以计算未使用的天数返还,这一点挺不错的,用起来不用担心被套进去。
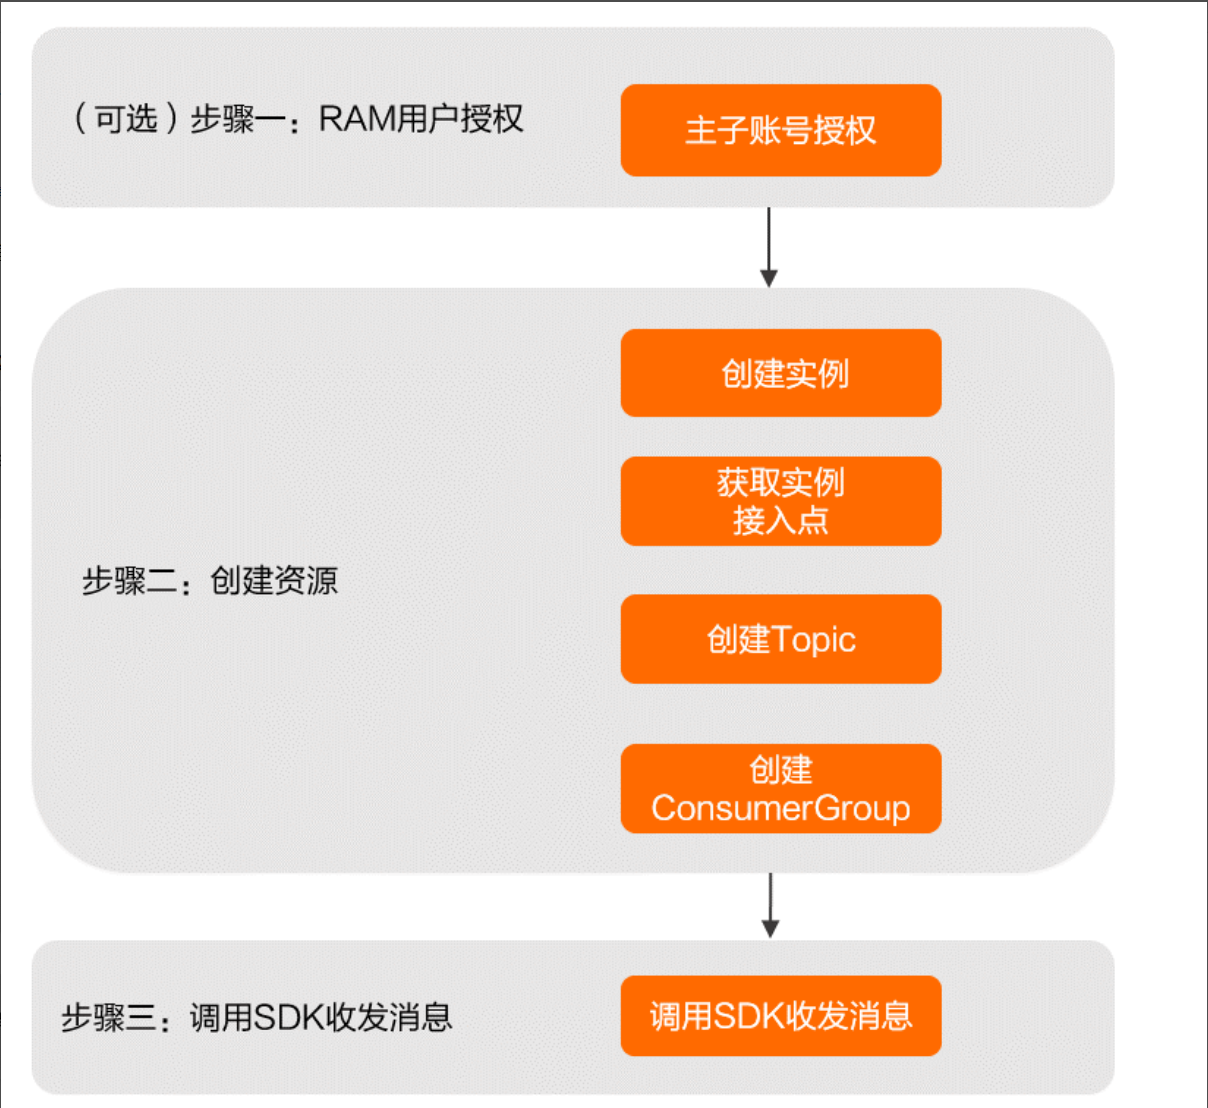
接入方式 商用RocketMq的接入步骤如下:
官方在快速入门中提供了创建资源的解释视频:https://help.aliyun.com/document_detail/441914.html 。有两个点需要注意,第一个点是RAM用户必须要进行账户授权才能正常使用,第二个点是对外访问方式设置,消息队列RocketMQ版支持VPC访问和公网访问。资源创建完成之后就可以使用官方提供的SDK收发消息,在使用之前需要注意下面这些前提:
之后便是在项目中引入JAVA依赖和复制粘贴模板代码验证。
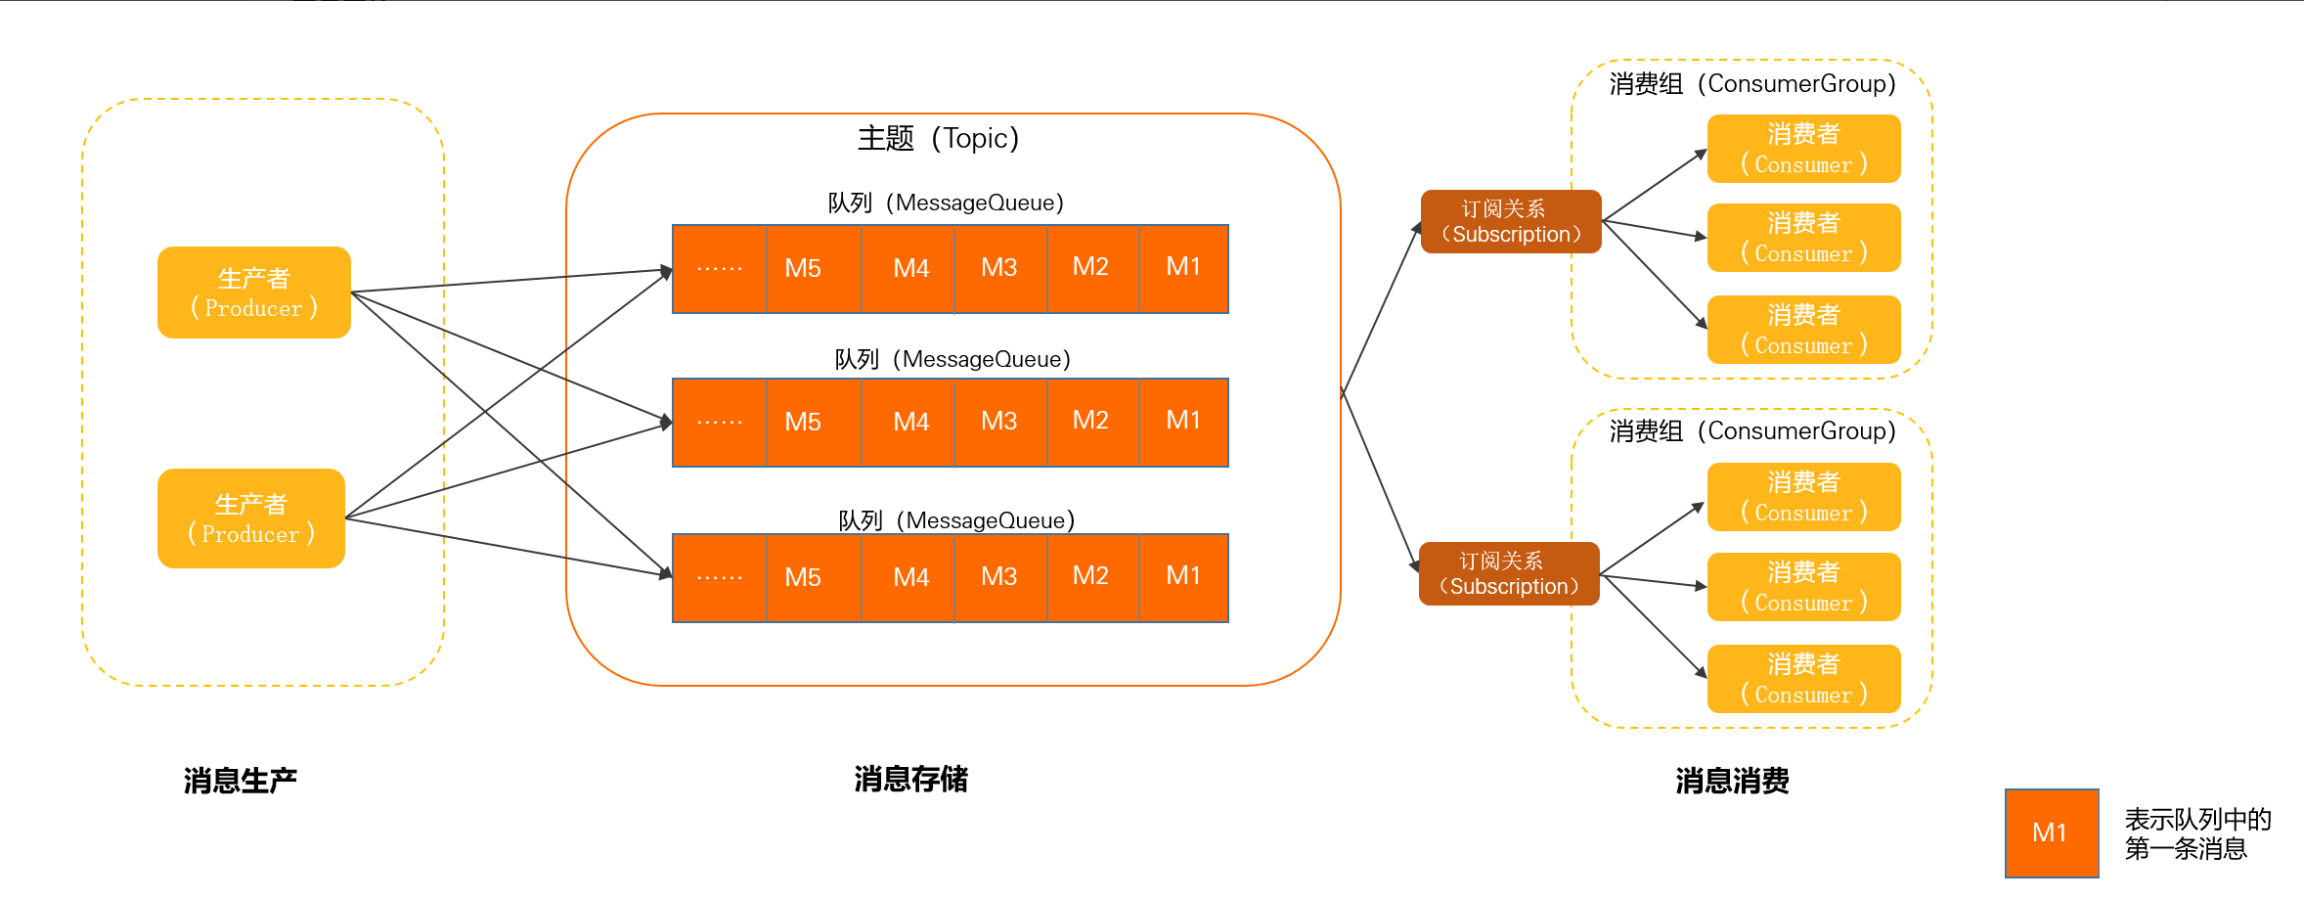
消息队列模型 商用RocketMq的基本使用逻辑如下:
按照消息类型,商用RocketMq提供了下面的消息类型:
SDK接入参考 SDK接入的主页链接如下:
https://help.aliyun.com/document_detail/69111.html
主要介绍了下面几个点,实际参考第二个推荐的接入方式即可。
SDK参考概述 商业版TCP协议SDK(推荐) 商业版HTTP协议SDK(多语言推荐) 社区版TCP协议SDK(仅供开源用户上云使用) 订阅消息常见问题
对于JAVA应用程序建议使用TCP协议SDK,集成的方式也比较简单,为了方便理解,也可以通过以下链接获取相关Demo,里面都有详细的注释解释:
spring/java-spring-demo springboot/java-springboot-demo
如果是HTTP协议的SDK,则使用下面的依赖包:
1 2 3 4 5 6 7 <dependency > <groupId > com.aliyun.mq</groupId > <artifactId > mq-http-sdk</artifactId > <version > 1.0.3.2</version > <classifier > jar-with-dependencies</classifier > </dependency >
如果是TCP协议的接入方式,则使用下面的依赖包:
1 2 3 4 5 6 <dependency > <groupId > com.aliyun.openservices</groupId > <artifactId > ons-client</artifactId > <version > 1.8.8.1.Final</version > </dependency >
接入细节说明 个人在实验的时候发现HTTP协议的版本集成SDK更像是给了一套API工具包,好处是可以不需要依赖Spring框架等单独使用,但是最大的缺点也是这里,很难用于框架当中,如果要实现自动接收消息并且处理,需要依靠手动实现定时任务 拉取消息实现自动消费,这一点也比较蛋疼。
这里列举 HTTP的SDK 的发送和接受代码,首先是生产者的模板代码,这些代码和开源的RocketMq使用类似:
1 2 3 4 5 6 7 8 9 10 11 12 13 14 15 16 17 18 19 20 21 22 23 24 25 26 27 28 for (int i = 0 ; i < 4 ; i++) { TopicMessage pubMsg; pubMsg = new TopicMessage( "hello mq!" .getBytes(), "A" ); pubMsg.getProperties().put("a" , String.valueOf(i)); pubMsg.setMessageKey("MessageKey" ); TopicMessage pubResultMsg = producer.publishMessage(pubMsg); System.out.println(new Date() + " Send mq message success. Topic is:" + topic + ", msgId is: " + pubResultMsg.getMessageId() + ", bodyMD5 is: " + pubResultMsg.getMessageBodyMD5()); } } catch (Throwable e) { System.out.println(new Date() + " Send mq message failed. Topic is:" + topic); e.printStackTrace(); }
而在接收方稍微麻烦一些,官方的案例是使用 死循环 不断检查Broker是否有积压消息,如果有则通过主动拉取消息 的模式去拉取消息。
实现多线程等待的效果可以写入到Thread继承类的Run方法中。
1 2 3 4 5 6 7 8 9 10 11 12 13 14 15 16 17 18 19 20 21 22 23 24 25 26 27 28 29 30 31 32 33 34 35 36 37 38 do { for (Message message : messages) { System.out.println("Receive message: " + message); } { List<String> handles = new ArrayList<String>(); for (Message message : messages) { handles.add(message.getReceiptHandle()); } try { consumer.ackMessage(handles); } catch (Throwable e) { if (e instanceof AckMessageException) { AckMessageException errors = (AckMessageException) e; System.out.println("Ack message fail, requestId is:" + errors.getRequestId() + ", fail handles:" ); if (errors.getErrorMessages() != null ) { for (String errorHandle :errors.getErrorMessages().keySet()) { System.out.println("Handle:" + errorHandle + ", ErrorCode:" + errors.getErrorMessages().get(errorHandle).getErrorCode() + ", ErrorMsg:" + errors.getErrorMessages().get(errorHandle).getErrorMessage()); } } continue ; } e.printStackTrace(); } } } while (true );
写在最后 算是一次个人兼容的笔记。还是要吐槽商用的RocketMq集成真的挺无语的,不过阿里的东西懂的都懂。


